
Lesser-Known Places Air Leaks Into Your Home
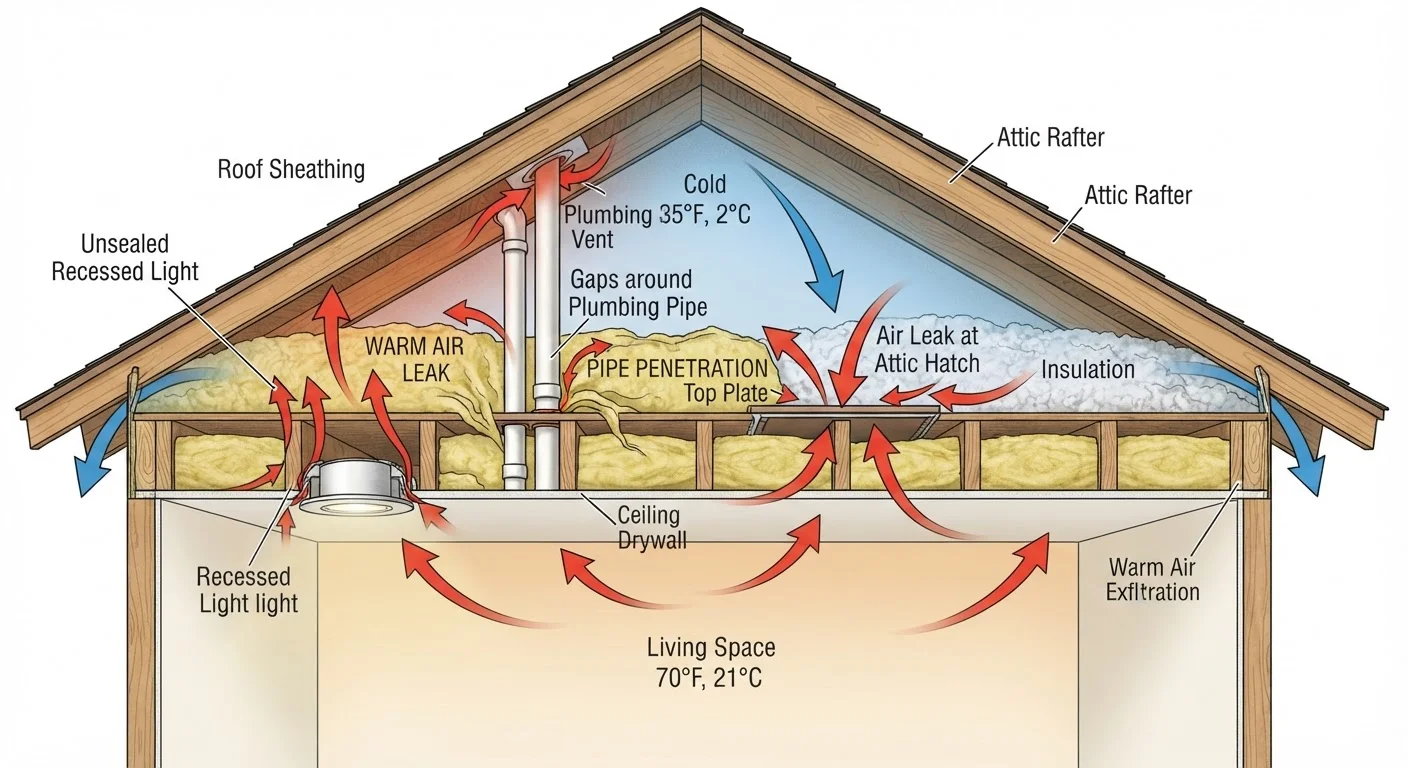
Photo credit: AdvisorHQ.net | Informative Website
Windows and doors get all the attention, but attic hatches, recessed lights, and plumbing penetrations are often bigger culprits. Here's where to look.
Key Takeaways
- Attic hatches, recessed lights, and plumbing penetrations are among the most significant air leak sources in most homes.
- Many hidden leaks occur inside wall cavities and are invisible without a deliberate inspection.
- Sealing these gaps with the right materials can noticeably reduce heating and cooling costs over time.
- Most of these fixes are DIY-friendly, though some locations near electrical components need extra caution.
Why the Usual Suspects Aren't the Whole Story
Most homeowners think of air sealing as a window and door project. And while those gaps matter, professional energy auditors consistently find that the attic floor, basement rim joists, and interior penetrations account for a disproportionate share of total air leakage in a typical American home. These locations are hidden, rarely inspected, and almost never sealed during original construction.
Closing these gaps can help reduce the strain on your HVAC system and improve comfort - especially near exterior walls and in rooms above unconditioned spaces. The fixes below are organized by location and include guidance on appropriate materials. For a deeper look at the tools you'll need, see our guide on caulk and weatherstripping.
Use the Incense Stick Test
On a cold, windy day, hold a lit incense stick near suspected leak locations. Smoke that wavers or bends toward or away from a surface indicates airflow. This low-tech method works well for outlets, hatches, and plumbing penetrations and costs almost nothing.
Attic Hatch or Pull-Down Stairs
The opening that gives you access to your attic is rarely well-sealed. Standard attic hatches are often just a thin piece of drywall or wood sitting in a frame, with no insulation and large gaps around the perimeter. Pull-down stair assemblies are even worse - the folding frame typically sits in a rough-cut opening with visible daylight around the edges.
Because warm air rises, this leak point is especially impactful in winter: heated air escapes directly into an unconditioned attic. An attic hatch cover kit - essentially an insulated box that sits over the hatch from above - is one of the most cost-effective air-sealing projects a homeowner can tackle. Apply foam weatherstripping around the frame to close the perimeter gap.
An uninsulated attic hatch can function like a chimney, pulling warm air out of your living space.
Recessed (Can) Lights on the Top Floor
Recessed light fixtures installed in ceilings below an attic are notorious air leakers. Older models - and many that are still sold today - have gaps between the housing and the ceiling drywall, and the fixture itself often connects directly to attic air space. Even one can light can allow significant airflow.
The fix depends on the fixture type. If the light is rated IC (insulation contact) and AT (air-tight), it can be sealed from above in the attic with caulk or foam. Non-IC fixtures need more clearance from insulation, so consult the manufacturer's guidance or a licensed electrician before sealing. Replacing older fixtures with airtight LED trims is another reliable option.
Recessed lights in top-floor ceilings connect directly to attic air - and most aren't sealed by default.
Plumbing and Pipe Penetrations
Anywhere a pipe passes through a floor, wall, or ceiling - drain lines, supply pipes, gas lines - there's usually a gap around it. These penetrations are cut during construction and rarely sealed afterward, since it isn't required by older building codes. Common locations include under bathroom and kitchen sinks, behind the washing machine, and in basements where pipes exit through rim joists.
Expanding spray foam works well for most pipe penetrations. For gaps around gas lines, use fire-rated caulk or fire-block foam - standard foam may not be appropriate near fuel lines. Always follow product labeling and local code guidance.
Pipe penetrations through floors and walls are almost never sealed at the factory - they need your attention.
Electrical Outlets and Switch Plates on Exterior Walls
Standard electrical boxes set into exterior walls are open to the wall cavity, which in turn connects to the outside. On a cold day, you can often feel a draft by holding your hand near an outlet on an exterior wall. This is one of the easiest fixes in the entire house: foam gaskets designed for outlets and switch plates cost very little and install in minutes with the power off at the breaker.
For more thorough sealing, remove the outlet box entirely and use an airtight box or apply caulk around the perimeter of the existing box where it meets the drywall. Always shut off power at the circuit breaker before working near any electrical component.
Outlet gaskets on exterior walls take minutes to install and are one of the highest-value sealing upgrades available.
Fireplace Dampers and Chase Tops
A traditional masonry fireplace damper - even when fully closed - leaks air substantially. The metal plate warps over time and rarely forms a tight seal. When the fireplace isn't in use, a damper balloon or chimney pillow inserted above the firebox can block airflow far more effectively than the damper alone.
Wood-framed fireplace chases (the vertical shaft enclosing a prefabricated fireplace) often have large gaps where the chase meets the attic floor. Sealing the top of the chase with sheet metal and high-temperature caulk, or adding a chase cover on the roof, addresses both air leakage and water intrusion.
A closed fireplace damper doesn't mean a sealed fireplace - most leak significantly even with the damper shut.
Rim Joists in the Basement or Crawl Space
The rim joist is the horizontal framing member that sits on top of your foundation wall and closes off the floor frame. It's one of the largest sources of air leakage in homes with basements or crawl spaces, yet it's easy to overlook because it's hidden behind insulation (if insulation is present at all).
Remove any existing batt insulation to expose the rim joist and check for gaps between the wood framing and the concrete or block foundation. Seal any visible cracks or openings with spray foam, then reinstall or replace with rigid foam board cut to fit snugly against the interior face of the rim joist. This approach both air-seals and insulates in one step.
Rim joists offer a wide-open air path between your foundation and living space that most homeowners never inspect.
Start Sealing Strategically
Once you've identified likely leak locations, prioritize by impact. Attic hatches and rim joists typically offer the greatest return because they're large and often completely unsealed. Electrical outlets are easy wins - low cost, no special tools required, and you can address an entire floor in an afternoon.
When to Call a Professional
Some air-sealing tasks - especially those near knob-and-tube wiring, gas lines, or structural cavities - should be handled by a licensed contractor or energy auditor. A professional blower door test can also pinpoint leak locations you might miss during a visual inspection, making your sealing efforts more targeted and effective.
If you're also considering attic improvements, our article on attic conversions and their trade-offs covers how structural and ventilation changes can affect air movement throughout the house. Methodical sealing from the top down - attic first, then living space penetrations, then basement - is generally the most effective sequence. Document what you seal so future contractors or home inspectors have a clear picture of the work that's been done.

Author
Home & Garden Editorial Team
Home & Garden Editorial Team is the collective byline for our editorial team and contributor network. Articles published under this byline or an editorial pen name are researched, written, and reviewed according to our editorial standards for clarity, consistency, and independence before publication.
View all articles →